Other Nav Threads:
Nav Work 101 - Cardinal Directions and Declination
Nav Work 103 - Pacing, Obstacles, and Nav-Nerds
What is a compass?
A compass is our handy navigational tool, that gives us a reference point. If you read the last thread you'll know a bit about the magnetic field of the earth, and how it's slowly crawling around up above Canada, but not quite at the North Pole.
If all is going according to plan, the needle on our magnetic compass points to that magnetic north pole. That would be the RED side of the needle should be pointing to Magnetic North. This gives us a realtively stable reference, that we can work some magic on, to in turn reference True North, and everything starts to fall into place!
Time out though, because it's not exactly that simple. The magnetic field of the earth is relatively weak, and there are lots of things that will overpower it. You need to be aware of that, in case your compass starts to odd things. First and foremost, magnets will screw up your magnet.. That one should be obvious. Electronics can as well if they are close or high enough power (try taking a bearing under high voltage lines), any ferrous metal that's large or close, iron rich rocks or hills, or if you happen to be somewhere between San Juan, Miami, and Bermuda. Your needle is going to point to the strongest magnetic field interacting with it, or will at the very least be deviated from where you want it to be pointing if there is some interference.
Case in point, there is a field out by Wyeth where if you set your compass on the ground, you can watch the needle spin in circles... That is a creepy feeling the first time you see it.. and a downright hearbreaking feeling when you really need it to be working!
Types of Compaii
There's lot of different types of compasses. Some are outright junk and should be avoided like the plague. Others have their uses and strengths in different situations
Fluid or Dry
I'll start off with this, since it was already asked of me. In general you're going to find compasses are either liquid filled, or 'dry'. The liquid used in a quality compass is typically purified kerosene. Slightly cheaper compasses will use alcohol. The liquid is there to act as a damper and smooth out the movement of the needle. It helps cushion it while being packed around to keep it from being jarred violently, and it allows for a faster sighting than would be possible with a dry compass, as they tend to move quicker and will oscillate around North for awhile before settling in.
Note: If the liquid in your compass was not off-gassed properly, or it develops a small leak, it can start to form a bubble. Drastic changes in pressure (climbing a mountain) can be an initiating cause to allow a small bubble to form. Once it's there I have no magic trick to make them go away, but if anyone does I'd love to hear it. In general a small bubble is not a problem, however while shooting a bearing you do *not* want that bubble to be touching your needle, or it will push on it and cause the needle to deviate. You can usually get around this by ever so slightly tipping the compass to move the bubble, however you should be shooting for keeping the compass level and stable, so if the bubble gets too large to effectively do that without compromising the bearing, it's time for a new compass.
Styles
I'm going to assume we're all beyond the happymeal "keychain" compass, and move into the actual outdoor gear world. I'll also be ignoring electronic, marine, aviation, gyro, and the dozens of other oddball compasses that most people wouldn't be bothering to pack with them.
Lensatic Compass

This is the sterotypical Military compass. Many are made with a solid brass body, and are extra rugged. In all honesty I don't have a LOT of experience using a lensatic compass, and I know they can be extremely accurate if used correctly, but they tend to be more hassle than they are worth. There are better more versitile compasses listed below for the average hiker. If you are former military, and learned on a lensatic compass than by all means stick with it. If you're starting out green, I would recommend another choice
PS: For you military guys, I do not do my navigation in Mils, I prefer Degree's, although you can usually find a compass in either or.
Orienteering Compass

These are usually cheap, quick and dirty compasses. Commonly used for orienteering courses, most of them will not declinate (discussed below), and lack elements necessary to do an accurate bearing on them. Most orienteering courses are run in magnetic north (which is a bad practice IMO) and focuses more on instinctual navigation than actual bearings and paces. It's common to use "handrails" and other features in the actual navigation just as much if not more than their compass.
Matchbox Compass

Probably my second favorite compass. These are small and compact, they close entirely and are relatively protected. They're easy to site with and can be pretty accurate, however they're slightly more difficult to work with on a map. If you want something small and light I would go this way.
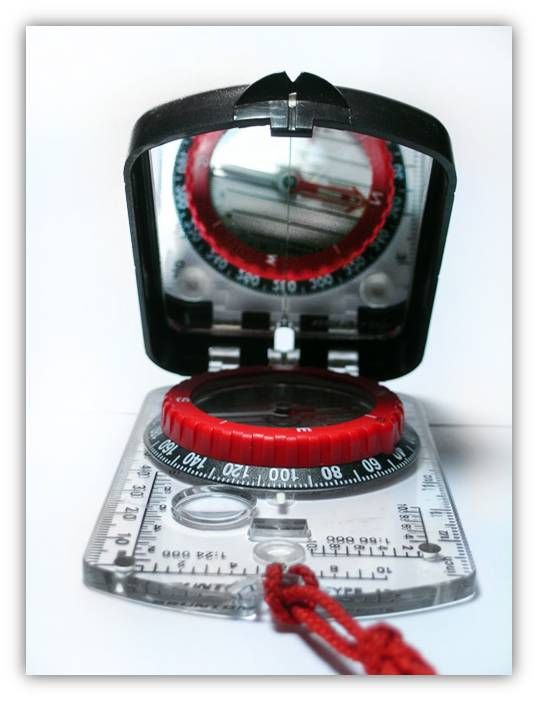
Mirrored Compass

This is my favorite, and what I feel is would be among the most versatile. Unfortunately you're going to start pushing into the $30-80 range with these, but if you're going to be relying on it, or using it often I would say it's well worth the money. Suunto, Brunton, and Silva being the popular brands. I'll be using this as my example in the rest of the thread for consistencies sake, and I think you'll see why I like its features.
Parts of a Compass
If you're going to use one properly, it's important to know the different parts. Some of these compasses are very very basic, and some (like the one pictured here) probably have features most of us will never use.
Sighting line/notch
one Of the elements used while you're taking an accurate bearing
Mirror
Fairly common sense that the mirrory bit would be called the mirror... A good compass should have a line running down the center of it, that is in line with the sighting line on top. We'll discuss that purpose later
Bezel
The bezel is the ring around the compass (in this case the red and black part). It will have degrees marked out on it, as well as cardinal directions usually. Most compasses mark every 2°, although when you get into more compact or cheaper models that could change. Be sure to know what yours is! The bezel should be able to rotate
Base Plate
Again, fairly common sense. Base plates can be extremely basic and blank, or they can have a host of other features on them like mine pictured. It's got a ruler, UTM scale, magnifying glass and a few other bits and pieces I rarely use. Personally if you're going to use your compass on a map, try and find one with a transparent base.
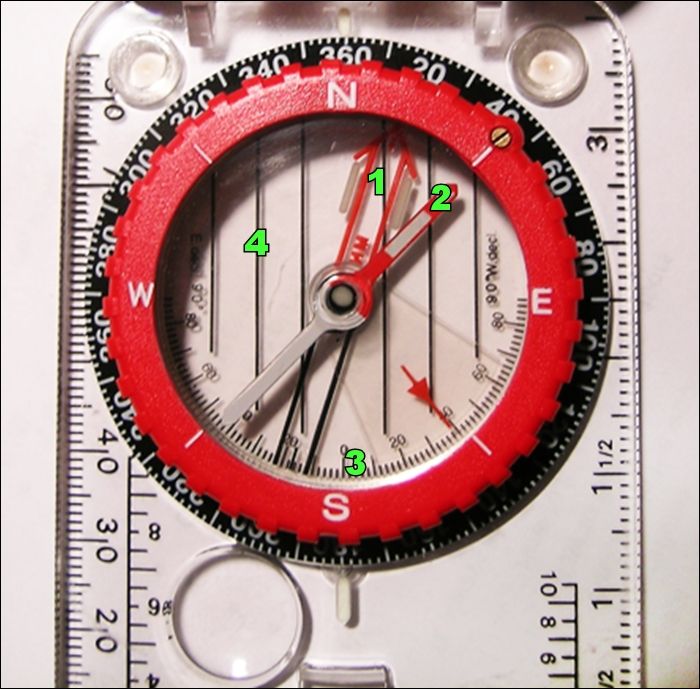
1: Orienteering Arrow
On a compass right out of the box, this arrow will be lined up with North. We discussed "adjustable declination" compasses in the last thread, and this is where it comes in. The Orienteering Arrow, or as I have always called it The Shed (get it? kinda looks like a little barn..) is where you will line up the needle when you're taking a bearing. You "Put the red in the shed"
My compass shown there is predeclinated, so I don't have to do the math, or hurt my head while I'm in the field to change between magnetic and true. The Shed is adjusted to be 16°E of true, so everything I shoot with my compass will remain in true, until local declination changes, or I move far enough away on the planet to warrant a change.
Note: If you scroll on up and look at the orienteering compass, you'll see that it's actually painted on the bottom of the compass and does not move. There are ways to declinate it but I'd rather not get into that unless people have specific questions about it.
2: Magnetic Needle
This would be your needle. It's a delicate piece and shouldn't be abused so be careful with it. If you're getting a brand new compass, you would be well advised to make sure it's not backwards. They're rare, but I've seen a few compasses that are magnetized backwards, and you don't want to be finding that out when you actually need it!
The RED side should be North, in this case there is a little N on the tip (underneath where I put the 2), and a small glow in the dark patch to make night navigation easier.
3: Declination Adjustment Scale
This is the arc of tick marks at the bottom of the compass, used to adjust your declination. In this case the picture is old, so I'm actually declinated to 17°E in it, but you can see that the 0 line is directly under N, with the east and west declination respective. This guide is on the opposite side of the shed, so East decinlation will actually be kicked to the West side.. Hopefully that didn't just confuse everyone.
4: Orienteering Lines
These are the black lines, running N/S on the bottom of the compass. These lines should ALWAYS be oriented to the N/S on the bezel. They will come into play when we start working with the map and compass together.
Not Numbered: Direction of Travel
At the top, outside of the bezel right between it and the mirror is a small white mark. That is your 'direction of travel' where you will set and read bearings from. There is an opposite mark on the bottom.
Bearings
First off, let me say that a bearing, and an azimuth commonly used interchangeably, technically they're not the same thing, but I'm going to stick to simple language and say bearing.
There are two main ways you're going to use a bearing. Either you will be finding a bearing (what's the bearing to that tree over there?) or you will have a the number already, and want to follow a specific bearing (ie, you want to go east, so you'll follow a bearing of 90°)
There is nothing remarkably different about how to do this. But there are some techniques to make things more accurate.
How to hold your compass

You'll see a number of books and websites describing bearings with people lazily holding their compass at their belly, staring at the needle while they walk. This is bad form and will lead to errors.
You should hold your compass at eye level, and almost at arms reach (get it away from your pack and other gear and dangly bits hanging on you) The mirror should be at a 45° angle, so you are looking into the mirror and down onto the bezel. You should not be looking at the needle itself.
Remember the line in the mirror that I mentioned earlier? While you're holding your compass out there, you will want the line in the mirror to be passing through the center of the reflection of the pivot point of the need. This is to ensure you're holding your compass straight, and things are relatively level.
To Find a Bearing
If you want to find a bearing to a specific target that you're looking at, you're going to hold your compass out like we just described above, and put your target right in the center of the sighting line/notch on top of the mirror. Make sure everything is lined up, the line on your mirror is running through the middle pivot, and then you're going to carefully turn the bezel of your compass to Put Red in the Shed. Once you've done all that, visually run through everything again, make sure you're still on target and lined up, and the needle/shed are accurate to your needs, and then you can look at that direction of travel mark between the bezel and mirror to read what the bearing was.
To Shoot a Bearing
If instead you have a specific bearing that you want to travel on, we're going to tweak the process just a little bit. You'll turn your bezel to your desired bearing (Say 270° if you want to go due West). You'll assume the position, and rotate yourself. Body, compass and all, until you put Red in the Shed. You should NOT turn the bezel once you've set the bearing you want. You are trying to orient your body in the direction you want to go.
Once you've done that, you can look through the sighting notch and find an appropriate 'target' that you will walk to, sight a new bearing to get a new target and repeat until you reach your destination. What makes an appropriate target you ask? Good question!
You want to find something that isn't too far off, and you want to find something that is unique enough that you can identify it, even if you look away, or are seeing it from a different angle. When you reach *one* target, and are getting ready to leapfrog to the next, take the time to examine it a little bit so that in case you do royally screw up, you can still return to your last point and try again. If you're not worried about tracking distance, it doesn't matter where you wander between point A and B, as long as you arrive at B you'll still be on your bearing.
I'll get more into bearings and compensating for PITA terrain and such in a later post/thread. I think this is enough for one post though.
Question/Comments??


